Usage Guide
Instructions on how to use your new Narwall Mask
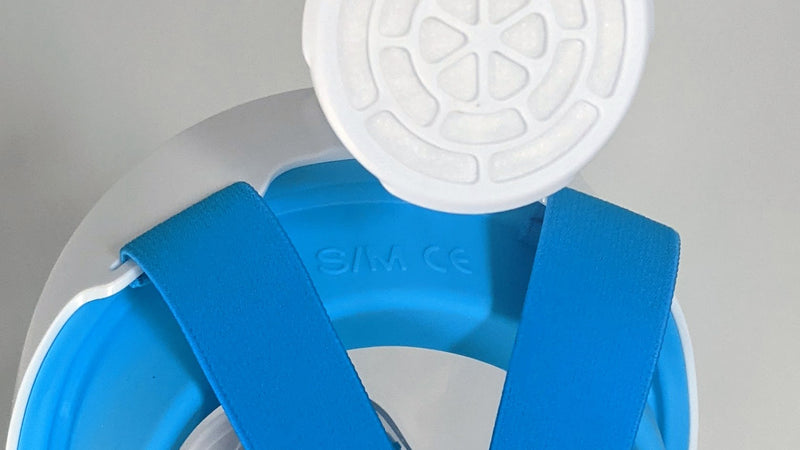
Identify the size
You can see whether a mask is an S/M or L/XL size mask by looking at the top of the silicone, where the size will be embossed.
Attaching the straps
When your Narwall arrives, you may find that the elastic straps are not attached to the bottom of the mask. If that's the case, here's how you can attach them:
- Locate the white plastic buckle at the end of each strap (there will be one buckle for each side of your mask). Each buckle has a small knob on one side.
- Locate the small triangular notch on each side of your mask, towards the bottom (again, one notch per side).
- On each side of your mask, place the small nob on the buckle through the notch on the side of your mask.
- Once the nob is inserted, pull the strap tightly (away from the mask) until you hear a click.
You should also peel off the protective plastic film from the clear plastic.
Putting on your mask (donning)
- Wash your hands and push any hair off your forehead and face.
- Hold the two elastic straps in each hand at the point that they meet, so that the mask is hanging down in front of you.
- Bring the mask up towards your face, placing your chin inside the chin area of the mask.
- Pull the elastic straps up and over your head on either side, bringing the top of the mask to your forehead, until the mask is flush with your face.
- Reach your hands to the back of your head and pull the round elastic band down towards the back of your neck. Pull only as far as is comfortable—no need to force it. (To avoid catching the band in your hair, hook the band at two points with your pointer fingers.)
Tightening the Narwall Mask
- Place one hand on the plastic buckle (where the strap connects with your mask) to hold it steady.
- Grab the end of the strap with your other hand.
- Pull on the end of the strap to tighten.
- Each strap has a loop to keep the strap flush against your face. After tightening, make sure the strap loop is pushed towards the base of the strap, touching the plastic buckle.
- Both straps should be adjusted to the same tension. You can ensure this by checking that both straps are the same length at the end.
Note: it may be easier to adjust the straps while the mask is not on your face.
Loosening the Narwall Mask
- Pull the loop away from the plastic buckle to create space between the two.
- Pull the long part of the strap away from the buckle.
- Once again, both straps should be adjusted to the same tension. You can ensure this by checking that both straps are the same length at the end.
Note: it may be easier to adjust the straps while the mask is not on your face.
Testing and fitting your mask
A negative pressure test is a quick and easy way to check the quality of your fit (ie; whether you have an airtight seal).
- Put your mask on and adjust to your preferred tightness using the instructions above.
- Place the silicone disk over the inhale filter (the one at the top).
- Attempt to take a deep breath. If you have a good seal, the mask will suck in towards your face and it will feel difficult to breathe. Don’t panic—just remove the disk!
- If you can still feel air entering the mask when you inhale, your mask may not have an airtight seal; see tips below.
Note: for many applications, a perfect fit (seal) may not be required. Consider how concerning a small amount of air coming in at the edge of the mask is for you, and how it compares to alternatives. As with other masks, achieving a perfect seal can involve a tight fit.
Here are some tips on achieving a better fit:
- Tighten the mask and ensure the band is pulled down to the base of your head, as described above.
- Ensure that the straps on each side are the same tightness (you can compare their length when you take off the mask).
- If you still experience a gap, for example at your temples, scrunch your face in tight and press the mask lightly in towards your face after donning.
- Sometimes it can take a few times wearing the mask for it to break in and mould to your face.
- Ensure the drain plug at the bottom of the mask is plugged.
If you continue to have trouble achieving a satisfactory seal, reach out to us at support@narwallmask.com.
Removing your mask (doffing)
We know that taking off a mask is a great feeling—follow these steps to make sure you’re doing it effectively.
- Recommended: Wipe down the plastic exterior of the mask with a sanitizing wipe (bleach, alcohol, or hydrogen peroxide), taking care to avoid getting the filters wet.
- Pulling up from your chin, lift the mask up and off your head.
- Wash or sanitize your hands before touching your face.
Replacing filters
Like N95's, our filters are designed to last 8 hours of active use before their filtration efficiency becomes reduced. If you wear your mask for about an hour every day, we recommend that you replace your filters every week.
The filters are bidirectional and interchangeable; there is no "in" or "out" direction.
- Twist the filter cover about 1/4 to 1/3 of the way around.
- Pull the filter cover off. It is pop-off, not twist-off.
- Remove the filters and throw them away.
- Wash or sanitize and then completely dry your hands. Never get the filters wet as this may degrade their filtration.
- Place a new filter into each filter cover, gently pressing down along the perimeter until secured under three small plastic lips around the edge of the filter cover.
- Push the filter cover onto the mask, and twist in either direction until secure (up to 1/3 turn).
Cleaning the Narwall Mask
In daily use, wiping the mask down with alcohol sanitizing wipes (on the inside to prevent oil buildup, as well as on the outside) is a quick and easy way to clean the mask.
For deeper sanitization, Narwall is machine washable. The heat of a dishwasher—well over the boiling point—kills pathogens.
- Sanitize or wash your hands.
- Remove the filters and discard, as above, but do not replace them yet.
- Unplug the small drain hole at the chin of the mask.
- Optional, not pictured: Remove the "horn" at the top of the mask, as well as the two filter covers, and place them in the dishwasher separately (or handwash separately) for easier cleaning.
- Place your Narwall in your dishwasher (on the top level if you have an older model with an exposed heating element) and run it on a normal cycle. Alternatively, you can wash by hand with warm water and soap, or sanitize with 70% alcohol.
- Allow the mask to dry.
- To prevent spots or streaks, use a soft cloth or paper towel to wipe windex or white vinegar on the transparent polycarbonate elements.
- Once clean and dry, plug the drain hole at the chin of the mask.
- Place new filters in the filter covers, following the instructions above.
Flying with the Narwall Mask
Many people have taken great comfort by wearing Narwall while flying.
- Be aware that you will need to briefly lift the mask off your face for TSA to check your identity at security. They are doing this with all masks; it is brief enough that you can hold your breath.
-
At security, TSA may ask for the mask to be put through the scanner, so please bring a backup cloth, surgical, or N95 mask that you can use for
this.
In fact, some customers have found it easiest to simply wait until boarding the plane to don their Narwall. -
Most airlines require that masks have no direct exhaust valve – which is a great policy! Unlike most
full-face respirators, Narwall fulfills this; it has NO vent or direct exhaust
valve. However, some airline staff do not immediately understand this, so here are some tips if that happens:
- Demonstrate appreciation for the airline staff's commitment to keeping people safe; remember, they may have had to deal with frustrating anti-maskers in the recent past!
- Bring replacement filters and informational cards to show that the mask has NO exhaust vent or valve and is CDC, TSA, FAA, and airline compliant.
- Approach gate staff prior to boarding to affirm that your mask does not have vents and is compliant with their policies.
- Offer to wear a surgical-style mask under the Narwall. Trying to wear a surgical-style mask over Narwall will likely break the surgical-style mask.
- You must be able to quickly remove your mask in case of emergency, such as when oxygen masks are deployed. As you can see in the doffing section above, Narwall can be quickly removed with one hand; please practice this motion at home prior to your flight.
- It is difficult to sleep while leaning forward on a flight in a Narwall, so bringing an airplane neck pillow may help catch some shuteye.
Need help? We're here for you! support@narwallmask.com